This is my first blog post—hooray! That being so, it fits like a glove that I start my new hobby by describing all the steps that I carried out in order to create this website.
Most blog websites sites are created and hosted using WordPress. Even though I
confess I never used it, wouldn’t it be better if instead of storing our web
content in some relational database that we may not have directly access to, and
which we need to remember to create regular backups, we stored it in a git
repository instead? Enabling us to easily inspect the revisions made so far and
have the content always safeguarded in the remote repository at the cost of a
mere git push?
GitLab Pages takes this idea of git-as-a-database one step further as it facilitates publishing a static website directly from a remote repository, and for free—no more hosting fees! All it is necessary to do is to configure a special continuous integration job with a pointer to the directory where the HTML sources are, and the website will be magically made available at a specific web address.
The HTML sources are not usually committed to the repository. Instead, the content is produced in a markup language such as Markdown or RST and then a static site generator tool is used to create the website from the sources.
Static websites do not support any server-side processing. This is not usually a problem for a blog website unless it is desirable to enable readers to comment in the posts. In a later section, I explain how it is possible to support comments even in static websites.
Creating a Project from a Hugo Template
There are plenty of static site generators and Jekyll seems the most popular option. I didn’t want to install all the Ruby stack in my machine though, so I opted for Hugo. Hugo is written in a compiled language (Go), which plays an important role in explaining why it builds websites in a jiff. It includes a small web server that monitors the files for new changes and refreshes the page automatically in the browser when a change has been made. This is possible by injecting some javascript in the pages served by Hugo to reload the page automatically.
To create my blog website, the first thing that I had to do was to create the repository where the web content is going to be stored. To that end, I logged in in GitLab and in the top bar I clicked on [+] > New Project. Next, I clicked on the Create from template tab and selected Pages/Hugo as the template to use. I gave my project a name and finally clicked on Create project.
After the project was created, in the left pane I clicked on CI/CD > Pipelines, followed by Run Pipeline. The pipeline took a while to complete in the first execution, but after it finished the website was automatically published at the following web address:
https://tacgomes.gitlab.io/blog
The tacgomes is my GitLab username and blog is the name that I gave to my
project.
Configuration
Hugo makes previewing locally any changes to the website very easy. All I had to
do was to clone the repository, change to its directory, and start the web
server by running the hugo server command. Hugo displayed in the terminal a
local web address with an unrestricted port that could be used to preview the
website in a web browser.
The Pages/Hugo template that I used before came with a TOML-based
configuration file named config.toml. As I prefer YAML to TOML and Hugo also
supports the former, I renamed config.toml to config.yaml and used an
online converter tool to convert from one format to the other. This is a
fragment of the config.yaml that I use for my blog:
|
|
The beautifulhugo theme that came embedded as part of the Pages/Hugo
template was not up to date when I was creating my blog website, and a few
things were broken. For that reason, I downloaded the latest version of the
theme and copied it to the themes/beautifulhugo directory
inside the repository, after clearing first the directory contents.
Finally, to avoid any surprise related to differences between the content
rendered locally and the content rendered on the server, I changed my
.gitlab-ci.yml to use a Docker image for Hugo tagged with the same version of
Hugo installed in my workstation.
Staticman Integration
As I mentioned before, static websites do not support commenting on posts as there isn’t a CGI application running in the server that could handle the form data and save it somewhere.
Make way for staticman! staticman cleverly works around this issue by providing a tiny web service that reads the form data and creates a pull request on behalf of the reader for adding the new comment (or merge directly to master if moderation is not important).
To use staticman, first I added a new staticman.yml configuration file to the
top-level directory of my repository. This file will be read by the staticman
web service and it is used for example to define where in the repository the
comments should be saved and what the commit message look alike for adding a new
comments. A minimal example of this file is:
|
|
The beautifulhugo theme has already built-in support for staticman-based
comments. I only had to apply the following configuration to my config.yaml:
|
|
The last thing I had to do was to grant permissions to the staticman web service
to be able to create pull requests in my repository. Towards that goal, in the
GitLab page for my project, I clicked on Settings > Members and then
searched for the staticmanlab user and gave him Developer permissions.
Adding a Custom Domain
GitLab Pages supports configuring a custom domain to make the website available
using, for example, the https://tacgomes.com, https://www.tacgomes.com, or
even both web addresses. These are in addition to the one already provided by
GitLab Pages.
There are a couple of domain registrars to purchase a domain from. I chose domain.com as it had good reviews and fair prices. I didn’t bother in paying extra for a SSL/TLS certificate as Let’s Encrypt provides one for free. Besides, GitLab integrates now with Let’s Encrypt in a way that it is no longer necessary to manually download the certificates and prove the ownership of the domain.
After I purchased my domain, in the GitLab page for my project, I clicked on
Settings > Pages and then New Domain. I entered tacgomes in the
Domain box and clicked on Create New Domain. A page was displayed with
the verification DNS record (in the Verification status section) that should
be added to prove the ownership of the domain.
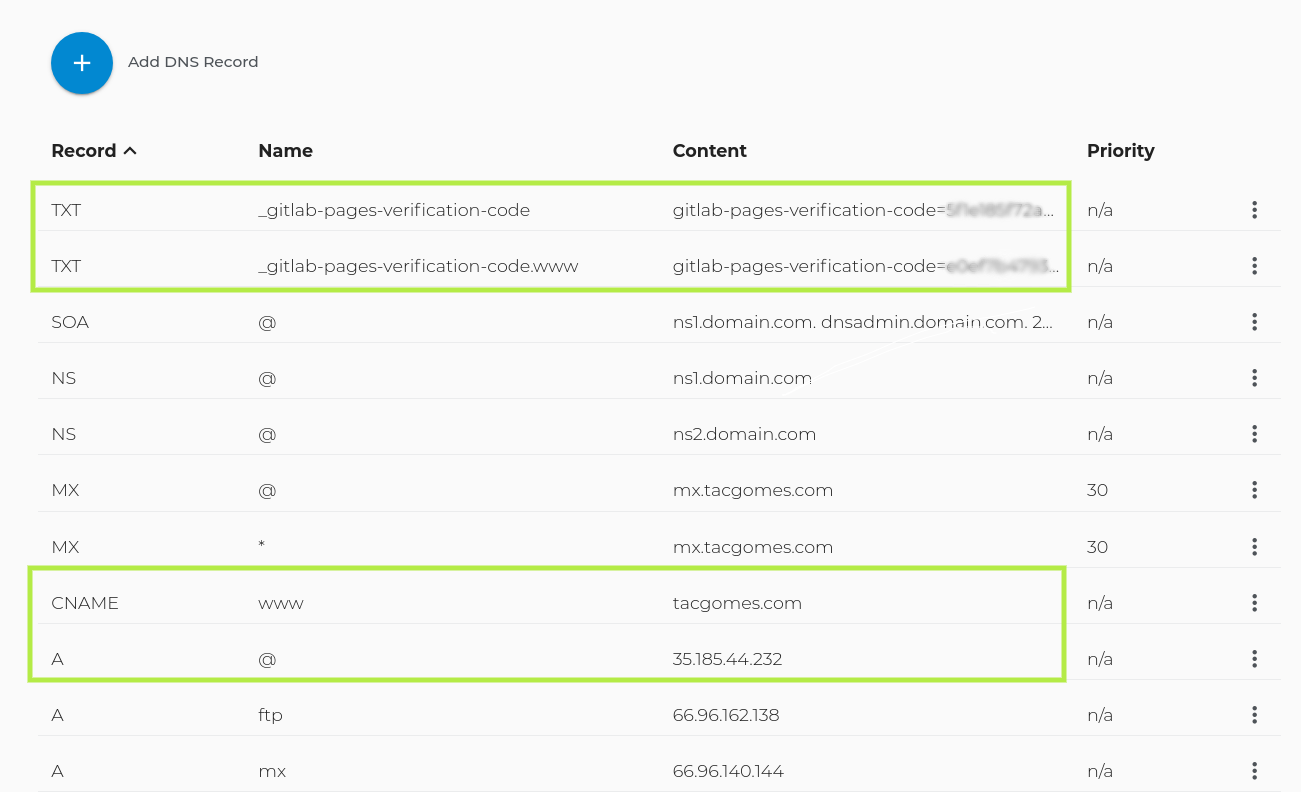
Now, in the admin interface for my domain registrar, I first deleted all the
records of type A where the Name matched either my domain name or @.
Then, I created a new record of type A and I entered @ in the Name box
(@ is an alias for the domain in use) and 35.185.44.232 (the IP address of
the GitLab Pages server) in the IP Address/Record Data box.
Next, I created a record of type TXT and filled it with the contents of the
verification DNS record shown in GitLab. I entered the part before TXT
(_gitlab-pages-verification-code.tacgomes.com) in the Name box and the
part after the TXT (gitlab-pages-verification-code=...) in the Content
box.
After this was completed, I had to repeatedly click on Retry in the GitLab page for the domain until GitLab was able to verify that the domain was effectively mine. It can take up to a couple of hours until the DNS updates propagates down and the verification finally succeeds.
To make my website available as well at the https://www.tacgomes.com web
address, I created a record of type CNAME and entered www in the Name
box and tacgomes.com in the Content box. Then, I repeated the process for
adding a domain in GitLab and the verification DNS record on my domain
registrar.
To wrap it up, I updated the baseurl field in my config.yaml to use my
custom domain.
The following picture highlights the DNS records that I had to add to configure my custom domain.
1 comment
Tiago
Test staticman!
Modal Header
Some text in the modal.